摘要:
下载地址为:http://zbar.sourceforge.net/iphone/index.html2.创建新项目。
版权声明:本文为博主原创文章,未经博主允许不得转载。
1.使用ZBar项目。下载地址是: http://zbar.sourceforge.net/iphone/index.html
2.新建一个项目。
3.导入 ZBar的sdk。把ZBar SDK的目录拉入项目,然后选中copy选项
4.在项目文件的target中加入 以下framework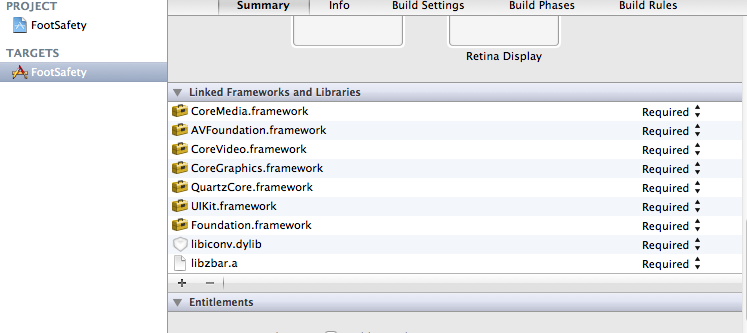
5.在appDelegate文件中加入 标记部分的代码
- - (BOOL)application:(UIApplication *)application didFinishLaunchingWithOptions:(NSDictionary *)launchOptions
- {
- self.window = [[[UIWindow alloc] initWithFrame:[[UIScreen mainScreen] bounds]] autorelease];
- // Override point for customization after application launch.
- self.viewController = [[[ViewController alloc] initWithNibName:@"ViewController" bundle:nil] autorelease];
- self.window.rootViewController = self.viewController;
- [self.window makeKeyAndVisible];
- // force view class to load so it may be referenced directly from NIB
- [ZBarReaderView class];
- return YES;
- }
注意此代码:
- // force view class to load so it may be referenced directly from NIB
- [ZBarReaderView class];
- //
- // ViewController.h
- // FootSafety
- //
- // Created by 泽宇 徐 on 12-6-12.
- // Copyright (c) 2012年 __MyCompanyName__. All rights reserved.
- //
- #import <UIKit/UIKit.h>
- #import "ZBarSDK.h"
- @interface ViewController : UIViewController<ZBarReaderViewDelegate>
- {
- IBOutlet UILabel * label ;
- ZBarReaderView *readerView;
- ZBarCameraSimulator *cameraSim;
- }
- @property(nonatomic,retain) UILabel * label ;
- @property (nonatomic, retain) IBOutlet ZBarReaderView *readerView;
- @end
7.在.m文件中要实现的主要方法是:
- - (void) readerView: (ZBarReaderView*) view
- didReadSymbols: (ZBarSymbolSet*) syms
- fromImage: (UIImage*) img
- {
- // do something useful with results
- for(ZBarSymbol *sym in syms) {
- self.label.text = sym.data;
- break;
- }
- }
这里是功能是读取照片信息,把条码放如label显示
- -(void) viewDidAppear:(BOOL)animated
- {
- // run the reader when the view is visible
- [readerView start];
- }
这个是在显示视图的时候,启动摄像头,开始扫描
- - (void)viewDidLoad
- {
- [super viewDidLoad];
- // Do any additional setup after loading the view, typically from a nib.
- // the delegate receives decode results
- readerView.readerDelegate = self;
- // you can use this to support the simulator
- if(TARGET_IPHONE_SIMULATOR) {
- cameraSim = [[ZBarCameraSimulator alloc]
- initWithViewController: self];
- cameraSim.readerView = readerView;
- }
- }
在初始化的时候,设置托管。
.m文件所有内容是:
- //
- // ViewController.m
- // FootSafety
- //
- // Created by 泽宇 徐 on 12-6-12.
- // Copyright (c) 2012年 __MyCompanyName__. All rights reserved.
- //
- #import "ViewController.h"
- @interface ViewController ()
- @end
- @implementation ViewController
- @synthesize label;
- @synthesize readerView;
- - (void)viewDidLoad
- {
- [super viewDidLoad];
- // Do any additional setup after loading the view, typically from a nib.
- // the delegate receives decode results
- readerView.readerDelegate = self;
- // you can use this to support the simulator
- if(TARGET_IPHONE_SIMULATOR) {
- cameraSim = [[ZBarCameraSimulator alloc]
- initWithViewController: self];
- cameraSim.readerView = readerView;
- }
- }
- -(void) viewDidAppear:(BOOL)animated
- {
- // run the reader when the view is visible
- [readerView start];
- }
- - (void) readerView: (ZBarReaderView*) view
- didReadSymbols: (ZBarSymbolSet*) syms
- fromImage: (UIImage*) img
- {
- // do something useful with results
- for(ZBarSymbol *sym in syms) {
- self.label.text = sym.data;
- break;
- }
- }
- - (void)viewDidUnload
- {
- [super viewDidUnload];
- // Release any retained subviews of the main view.
- }
- - (BOOL)shouldAutorotateToInterfaceOrientation:(UIInterfaceOrientation)interfaceOrientation
- {
- return (interfaceOrientation != UIInterfaceOrientationPortraitUpsideDown);
- }
- -(void) dealloc
- {
- [self.readerView release];
- [self.label release];
- [super dealloc];
- }
- @end
在ViewController.xib文件中 增加一个view,并且修改view的类是ZBarReaderView ,并且指向 .h文件中定义的
- ZBarReaderView *readerView;
版权声明:本文为博主原创文章,未经博主允许不得转载。

1.使用ZBar项目。下载地址是: http://zbar.sourceforge.net/iphone/index.html


2.新建一个项目。

3.导入 ZBar的sdk。把ZBar SDK的目录拉入项目,然后选中copy选项

4.在项目文件的target中加入 以下framework


5.在appDelegate文件中加入 标记部分的代码
[cpp] view plain copy
- (BOOL)application:(UIApplication *)application didFinishLaunchingWithOptions:(NSDictionary *)launchOptions
{
    self.window = [[[UIWindow alloc] initWithFrame:[[UIScreen mainScreen] bounds]] autorelease];
    // Override point for customization after application launch.
    self.viewController = [[[ViewController alloc] initWithNibName:@"ViewController" bundle:nil] autorelease];
    self.window.rootViewController = self.viewController;
    [self.window makeKeyAndVisible];


    // force view class to load so it may be referenced directly from NIB
    [ZBarReaderView class];


    return YES;
}
注意此代码:

[cpp] view plain copy
// force view class to load so it may be referenced directly from NIB
 [ZBarReaderView class];

6.在.h文件中加入   ZBarReaderViewDelegate的实现,代码如下:
[cpp] view plain copy
//
//  ViewController.h
//  FootSafety
//
//  Created by 泽宇 徐 on 12-6-12.
//  Copyright (c) 2012年 __MyCompanyName__. All rights reserved.
//

#import <UIKit/UIKit.h>
#import "ZBarSDK.h"

@interface ViewController : UIViewController<ZBarReaderViewDelegate>
{
    IBOutlet UILabel  * label ;
    ZBarReaderView *readerView;
    ZBarCameraSimulator *cameraSim;
}

@property(nonatomic,retain) UILabel * label ;
@property (nonatomic, retain) IBOutlet ZBarReaderView *readerView;


@end

7.在.m文件中要实现的主要方法是:

[html] view plain copy
- (void) readerView: (ZBarReaderView*) view
     didReadSymbols: (ZBarSymbolSet*) syms
          fromImage: (UIImage*) img
{
    // do something useful with results
    for(ZBarSymbol *sym in syms) {
        self.label.text = sym.data;
        break;
    }
}

这里是功能是读取照片信息,把条码放如label显示

[html] view plain copy
-(void) viewDidAppear:(BOOL)animated
{
    // run the reader when the view is visible
    [readerView start];
}

这个是在显示视图的时候,启动摄像头,开始扫描

[html] view plain copy
- (void)viewDidLoad
{
    [super viewDidLoad];
    // Do any additional setup after loading the view, typically from a nib.

    // the delegate receives decode results
    readerView.readerDelegate = self;

    // you can use this to support the simulator
    if(TARGET_IPHONE_SIMULATOR) {
        cameraSim = [[ZBarCameraSimulator alloc]
                     initWithViewController: self];
        cameraSim.readerView = readerView;
    }

}

在初始化的时候,设置托管。

.m文件所有内容是:
[html] view plain copy
//
//  ViewController.m
//  FootSafety
//
//  Created by 泽宇 徐 on 12-6-12.
//  Copyright (c) 2012年 __MyCompanyName__. All rights reserved.
//

#import "ViewController.h"

@interface ViewController ()

@end

@implementation ViewController
@synthesize label;
@synthesize readerView;

- (void)viewDidLoad
{
    [super viewDidLoad];
    // Do any additional setup after loading the view, typically from a nib.

    // the delegate receives decode results
    readerView.readerDelegate = self;

    // you can use this to support the simulator
    if(TARGET_IPHONE_SIMULATOR) {
        cameraSim = [[ZBarCameraSimulator alloc]
                     initWithViewController: self];
        cameraSim.readerView = readerView;
    }

}

-(void) viewDidAppear:(BOOL)animated
{
    // run the reader when the view is visible
    [readerView start];
}


- (void) readerView: (ZBarReaderView*) view
     didReadSymbols: (ZBarSymbolSet*) syms
          fromImage: (UIImage*) img
{
    // do something useful with results
    for(ZBarSymbol *sym in syms) {
        self.label.text = sym.data;
        break;
    }
}


- (void)viewDidUnload
{
    [super viewDidUnload];
    // Release any retained subviews of the main view.
}

- (BOOL)shouldAutorotateToInterfaceOrientation:(UIInterfaceOrientation)interfaceOrientation
{
    return (interfaceOrientation != UIInterfaceOrientationPortraitUpsideDown);
}

-(void) dealloc
{
    [self.readerView release];
    [self.label release];
    [super dealloc];
}

@end

在ViewController.xib文件中 增加一个view,并且修改view的类是ZBarReaderView ,并且指向 .h文件中定义的
[cpp] view plain copy
ZBarReaderView *readerView;